Mura 10: Getting Started

Welcome To Mura

Mura is one of the most powerful and easy-to-use Content Management and Digital Experience Platforms available anywhere. It frees content contributors to focus on what they do best — work with content and connect with users — through an intuitive, straightforward platform.

Basic Concepts

This section explains the most common steps and basic concepts needed for getting started with Mura, like logging in, using the Front End Toolbar, publishing content and getting familiar with the Layout Manager.

Logging In

How To Log In

"Logging In" is the process of entering your username and password to access restricted content, such as a "members only" area of your website or the Mura Site Administrator.

There are generally two ways to log into Mura, via the Site Administrator or directly on a public-facing Front End page.

Site Administrator Login

The Site Administrator (or "Admin") area of your website is typically found at yourdomain.dom/admin.
If you visit this URL and are not logged in, you will see a login prompt that requests your name and password.

There are a limited number of attempts you can make before this page is temporarily locked from access. By default, access will be blocked for thirty minutes, though it is possible the length of time has been adjusted for your Mura installation.

Once you have entered the username and password, click on the Login button. If there is an error with the information you have entered, you will be returned to the same form, with a message displaying any problems with the login attempt.

Remember Me: when you activate this checkbox, the login form on this computer will remember your username.

Locale Selection: you may see a dropdown of different languages in the login form. This allows you to select the default locale (language) used in the Administrator interface.

Forgotten Password: Theforgot your passwordlink will reveal the password retrieval option. To reset your password, enter your email address and click on the Get Password button. An email will be sent with a time-sensitive link which will allow you to reset your Mura password.

Front End (Website) Login

You can also log in to Mura from the Front End (public-facing) portion of your website, by pressing the Escape Key on your keyboard <ESC> followed by the letter "l"(aka lowercase "L" as in "login"). The page will reload, displaying a a login form similar to the one in the Site Administrator area.

Some site designs remove or restrict this form from displaying on the front page, so if the form does not appear, try navigating to a different folder or page and try again.

Front End Permissions

There are two different categories of registered Mura users. Each has separate permissions for interacting with the site. First are the "system users", i.e. the people responsible for managing the website and its content, who generally have access to Mura's editing features and admin area if applicable. The second group are the "site members", for example, visitors who log in to access restricted areas of your site such as a "Members Only" area, or a personalized profile page.

You will know you have logged in when the front-end toolbar appears at the top of the page. (If you have collapsed this bar, you may only see the Mura logo near the top left corner of the page. Click the logo to show or hide the toolbar.)

Logging Out

Log Out of Site Administrator

When logged into the Site Administrator, you will see a dropdown menu in the top right-hand corner of the page, displaying your username and an icon. Clicking the Dropdown Arrow will display two options, Edit Profile and Log Out (clicking your username will open the Edit Profile view). Clicking on Log Out will immediately log you out of your current session, presenting you with the Login Form.

Log Out from Front End

When viewing your website while logged in, you will see the front-end editing toolbar along the top of the page.

Clicking on the Log Out button located on the right side of the toolbar will immediately log you out of your current session. The page may refresh.

If you do not see the front-end editing toolbar when you are logged in, it may be that the bar is minimized. The Mura Logo should be visible in the top left-hand corner of the page. Clicking the Mura logo will toggle the bar into view.

Front End Toolbar

When you are logged in to Mura you will  see the Mura Front End Toolbar displayed at the top of any public-facing Front End page. 

This toolbar provides access to several important features, including the Layout Manager and its associated Modules, as well as options for Adding and Publishing content, Mobile Preview, and Version History.

If you are logged in and do not see the Front End Toolbar, it means that either a) you do not have the correct permissions for editing content on this site, or b) the Front End Toolbar may be minimized. (Click the Mura logo in the upper left corner to show or hide the toolbar.)

Option Description
Edit Content (pencil icon)
  • Layout Manager: the Layout Manager activates Mura's suite of front-end editing features. Refer to the Layout Manager section for full details.
  • Edit Content: opens the content in Site Administrator view. Refer to the Managing Content section for full details.
Add Content (plus icon) Add a new content item as a child of the current page or folder.
Version History (circular arrow icon) View changes with dates and other details in theVersion History list.
Mobile Display (mobile icon) View the page reformatted to common mobile screen sizes.
Content Manager (flow tree icon) Open the current item inContent Manager view in Mura's site administrator.
Log Out End the current login session, viewing the page as a public viewer would see it.

Layout Manager & Inline Editing

With Mura, most content edits are made using the versatile and robust front-end editing options.

Layout Manager

Mura's powerful front-end Layout Manager offers a high level of flexibility and precision for the management of content, styling, layout and automation.

Edit Layout

To access the Layout Manager, first ensure you are Logged In and can see the Front-End Editing Toolbar at the top of the page. There you will see a Pencil Icon with a drop-down arrow beside it. Choosing the option Edit Layout will enable the Layout Manager, and will display the Modules menu on the right-hand side of the page.

The Modules menu is a list of all the modules available for placement on the current page. Some are basic Containers, while others will automate the inclusion of Feeds, Galleries and other options. See the Layout Manager Modules section of the Layout Manager documentation for detailed information.

Once the Layout Manager is enabled, hovering over editable sections of the page will reveal the section borders along with any Modules they contain, outlined with colored frames and descriptive labels showing the Module type. In addition to default editable areas, such as the "Body" section, other custom editable regions may appear. The availability and placement of these regions is controlled by the template that has been selected for the page or folder. 

In-Place Editing

To edit the primary text content of a page, simply double-click anywhere within the block of text you wish to modify. This will switch the context of the Layout Manager to Inline Editing mode. If the text is eligible for inline editing (the page's primary or "body" content, or an inline component) a minimal formatting bar with standard text editing options will appear above the selected section, and the content will become editable in place.

Once you have finished editing the block of content and completed any other desired changes to the page, you must save or "Publish" the page in order to commit the changes.

On the Front-End Editing Toolbar selecting theSave button will display the various publishing options available. Choose the appropriate one to commit your changes (more information on these options can be found in the Introduction section of the Content Manager documentation).

Note that access to the Layout Manager and inline editing is dependent upon a user's login credentials and permissions, and these may change from page to page and section to section. These permissions are controlled via the Users portion of the Site Administrator.

Edit Content

You can also edit the main "body" content of a page via the Content Editor within the Site Administrator. This can be accessed via the Edit (pencil icon) > Edit Content option in the Front-End Editing Toolbar. If you choose to edit content via the front-end, the view will temporarily switch to the Site Administrator > Content editor.

After clicking on the button, you will be presented with a full-width editor and a host of advanced options (the latter depending upon your assigned permissions).

Once you have finished editing the content and/or updating the advanced settings, choose the Save option at the bottom of the page appropriate to your needs (more information on these options can be found in the Introduction section of the Content Managers documentation). You will then be returned to the front-end and the page you recently edited.

Basic Publishing

Content managers have a number of publishing options with Mura CMS. We've listed an overview of some of the various options below. However, we'll have a more in-depth look at publishing options and workflows in the Permissions & Publishing section.

Action Description
Save Draft Allows you to save a temporary, non-published version of content for later editing or approval. Draft versions are available for review by the user who created the item, or by any site administrators
Preview Performs the same action as "Save Draft" and then displays what the content would look like if it were published on the front end view. If using "Preview" from the back end administration area, it will attempt to launch a new window.
Save to Change Set* Saves a version of the content in the desired "change set." A "Change Set" is a virtual grouping of changes, which can be previewed and published as a group at a future point. Change sets are managed via the Content Staging manager. We'll cover Content Staging in a future section. Please note that this option will appear only if the Content Staging Manager module is enabled via Site Settings.
Publish* Makes the content "live" and visible on the public-facing view of your site. The content item's status will become "Published." This action will also remove any "Draft" versions of the content item.

*Note: "Save to Change Set" and "Publish" options will only appear for groups that have been granted "Editor" roles. They will not appear for groups with "Author" roles.

Back-End Editing

While most content edits, and all Layout Manager changes, can be made on the front end, some advanced settings and configurations require access to Mura's Administration Area or "Admin".

There are two ways to access the Admin via the Mura Front-End Toolbar.

Assuming you are already Logged In, hovering over the Pencil Icon on the Front-End Toolbar will display a dropdown menu. Select "Edit Content" option to open the page in the Admin. After publishing, you will be returned to the original front end view for that page.

The second option is to click on the Tree View icon in the Front-End Toolbar, which opens the Content Manager's Tree View, "zoomed in" to the page you were viewing. From this location you can click on the page title or interact with any of the other options available for that page, or use the Breadcrumb Navigation to navigate the tree view from that point.

Coupled vs. Decoupled

The increasingly-popular "decoupled" content delivery architecture, where the public-facing front end website is separated from any administrative back end area, is enabled natively by the Mura platform. 

While standard "coupled" architecture continues to be fully supported, Mura's creators have gone to great lengths to insure a virtually seamless experience for developers opting to script their own front end pages using a completely independent framework, based on React or Vue JS, for example. Creating a Decoupled site in Mura means your content can still be managed and administered in a traditional front-end/back-end sense, while allowing for greater freedom of presentation, or distribution of content over a variety of devices, without losing any of the security or infrastructure provided by Mura.

Coupled aka Mura-Generated Websites

Mura also completely supports more traditional "Coupled" site architecture, and provides a powerful combination of options through both the front end layout manager and the back end content adminstration area. For traditional web development, Mura's versatile options for themes and custom modules provide ample tools to craft sophisticated websites, in whole or in conjunction with cutting-edge web technologies.

Decoupled or Headless Websites

In combination with Mura ORM and Mura JS, the Mura API allows developers to use any client-side technology such as Vue JS, React or Angular to develop their website, independent of its source. Developers who choose to create their front-end in this manner lose nothing in terms of security or permissions, but gain tremendous advantage over using a custom framework, leveraging Mura's years of experience and a wealth of management tools.

For example, User Entitiescan be retrieved via calls to the API in a variety of ways.

In Templates:

 userBean = m.getBean('user').loadBy(username='grant');

Via a JSON API call:

 https://www.mysite.com/index.cfm/_api/json/v1/v10/user/?username=grant

In Promise-style requests via Mura JS:

<script>
Mura.getEntity('user')
	.where()
    .andProp('username').isEQ('grant')
    .then(function(entity) {
        console.log(entity);
    })
    .catch(function(err) {
        console.log(err.get('errors'));
    });
</script>

In all cases, full permissions are used to evaluate the requests, with support for both browser-based, Node and other encapsulated applications (by default this is managed by cookies, but Mura includes tool sets for using advanced access control methodologies such as OAuth, when needed).

Restoring Deleted Content

Accidents can happen. Sometimes things get removed by mistake, or content turns out to be needed after it has been deleted. Fortunately, Mura's Trash Bin has these scenarios covered.

Every deleted item is preserved and ready to be restored to its original location, until the trash is intentionally "emptied".

Access the Trash Bin
 

  1. Go to Site Settings > Trash Bin
     
  2. Find the content to be restored, using the date and keyword search.
     
  3. Click the "Edit" icon to view metadata details for the desired item.
     
  4. To restore the content to a location other than the original parent item, use the "Select Parent" button before restoring the content.
     
  5. Click the "Restore" button to restore only the current item, or  "Restore All Items in the Delete Transaction" to restore any content items which were deleted at the same time.
     
  6. Lastly, verify your content restoration was successful by viewing the content at the expected location. 

Installing Mura

Mura On Premise Installation

Mura Hosting Environment

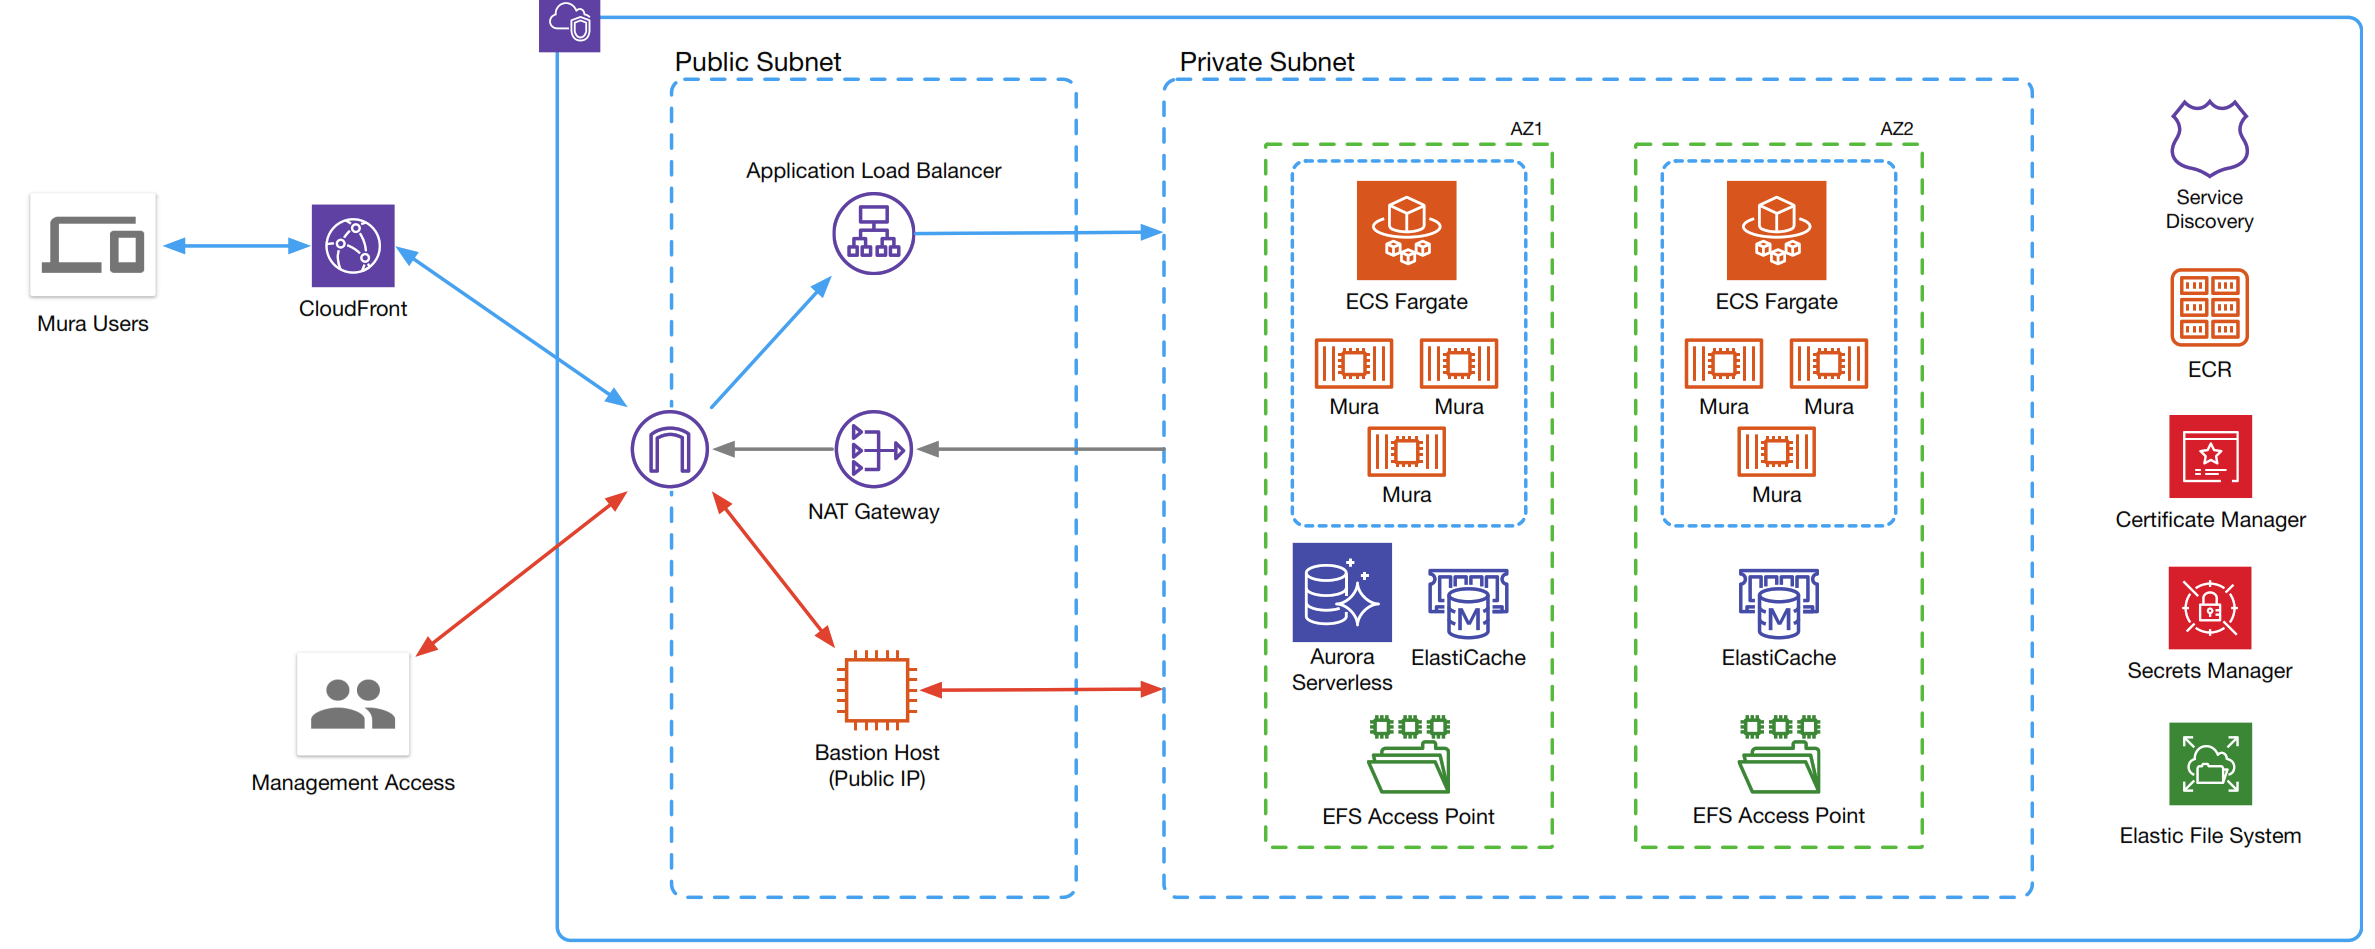
The Mura hosting configuration creates a secure, redundant, self-healing Virtual Private Cloud (VPC) via Amazon Web Services (AWS) and a host of Amazon- and integrated 3rd-party solutions. 

VPC lets you provision a logically isolated section of the AWS Cloud where you can launch AWS resources in a virtual network. Web servers and application servers in the VPC can leverage Amazon EC2 elasticity and Auto Scaling features to grow and shrink as needed.

Every Mura VPC is private and dedicated solely to the customer.

Route53 with Service Discovery is used to provide communication between the Mura Docker containers, which allows for multiple containers and multiple services. Along with its own Service Discovery, each VPS also has its own private Certificate Manager for managing SSL and other certifications; a Secrets Manager for separating API and other private keys/passwords from deployed repositories, and an Elastic File System for file storage.

Mura Configuration

Mura is instanced via Docker containers. Docker “containerizes” all the services required to spin up an instance of Mura, including web server, database and application engine. Many of these services are themselves Docker Images, integrated into the instance via the “compose” file.

The Mura Docker container will hold the latest official Mura Image, with options to use the Lucee or Adobe CF2016 based upon the CommandBox Docker Image, or the official Lucee Docker Image. The Docker compose may optionally include references to other images such as a mail server, Elastic Search or other integrated services.

The Mura Docker “compose” file contains references to the above images, as well as the environment variables needed to complete the installation.

There are several other configuration files that are used in a “deployed” environment such as the VPC. You can view an example of these in a GitHub Gist. These include configurations for Mura itself, NGINX, and Docker.

cfapplication.cfc (example)

The cfapplication.cfc is the base configuration for the Mura instance and other (i.e. Docker compose) environment variables. Separate configurations can be used for staging (review) and live (production), for instance. 

this.ramBase = {
	class: 'lucee.runtime.cache.ram.RamCache'
	, storage: false
	, custom: {
		"timeToIdleSeconds":"3600",
		"timeToLiveSeconds":"10800"
	}
	, default: ''
};
	
//This must be done per site
this.cache.connections["default-data"] = duplicate(this.ramBase);
this.cache.connections["default-output"] = duplicate(this.ramBase);

In the example above, the RAM allocation for the application engine is adjusted.

NGINX default.conf (example)

NGINX can be used in a variety of ways, from load balancing to caching. One specific way we use it is for proxying our AWS S3:

  set $s3 "s3host";
  set $bucket "s3bucket";
  set $proxy "proxyhost";

If you view the example file, you will see how these variables are applied to proxy the AWS storage.

Dockerfile.mura (example)

These is the command-line instructions for assembling our Mura Docker image. In this file we run startup parameters for the cfml engine, integrate Fusion Reactor, and importantly run a health check on the image:

HEALTHCHECK --start-period=3m CMD curl --fail http://localhost:8888/?healthcheck || exit 1

If this test fails, the process will halt until the issue is resolved. This ensures that new images pass the Mura Unit Tests.

Dockerfile.nginx (example)

This script runs during the assembly of the NGINX Docker Image. As with the NGINX default.conf (see above), this establishes the proxy settings for the deployment.

Docker-compose.yml (example)

The docker-compose file runs when the Mura Docker instance is spun up, identifying all the of required Images and their general configurations.

There are several key integration points here. The first is with Mura environment variables, which translate directly to the settings.ini.cfm file:

	environment:
		MURA_ENVIRONMENT: local
		LUCEE_JAVA_OPTS: "-Xms512m -Xmx1536m"
		MURA_DATASOURCE: ${dbname}
		MURA_DATABASE: ${dbname}
		MURA_DBTYPE: mysql
		MURA_DBUSERNAME: ${dbusername}
		MURA_DBPASSWORD: ${dbpassword}

You will notice the relationships between the two files and their variables. Also note that several of these have ${variable} string variable-type markers throughout. This is to prevent having passwords stored within the repositories. During deployment, these variables can be substituted with real values. Internally, Mura uses Buddy.Works and their pipeline deployment process to replace these placeholders with actual values. The same would be true for the AWS Secrets Manager and other pipeline processes.

Mura in the VPC

Mura instances are spread across AWS Availability zones. Each zone is configured with Auto-Scaling that will scale-out based upon requests-per-target or CPU usage. It will likewise scale-in to reduce costs when not utilized.

Each availability zone uses Fargate as the capacity provider, along with the Amazon Elastic Container Service (ECS) as the orchestration service for the Mura Docker containers. Fargate Spot can also be utilized to provide a low cost option for fault tolerant applications.

Each zone contains an access point to the Elastic File Server, and ElastiCache is used to provide persistent Session storage, allowing for seamless scale-in and scale-out events.

Aurora Serverless is used to provide automatic failover and automatic scaling based on application load (based upon MySQL 5.6 or 5.7). 

Public Network

Amazon CloudFront is the public-facing, global-distribution CDN for the VPC, with Mura and its assets as the origin. This insures low latency, high resiliency and high transfer speeds across all locales. 

Behind this is the public subnet. An Elastic Load Balancer using the AWC Certificate Manager to provide secure connections across the redundant availability zones. A NAT gateway provides outgoing access for the Mura containers. The “Bastion” jump host provides direct access for operations or the server management team (see Private Network, below).

Private Network

The private network is placed across multiple availability zones to provide high availability and redundancy.

Bastion (aka “jump”) servers act as an extra layer of security by keeping containers isolated from the public internet. Direct access to containers by server operations or management can be achieved via the Bastion host. It can also be configured to allow access via other AWS services such as AWS Direct Connect or AWS Client VPN connection.

System Requirements

On-premise installations of Mura may be deployed using Docker, or on a non-containerized application server. 

Supported Container Platform

Supported Application Servers

*Adobe ColdFusion 2018 has a known performance issue when used with Java 11

Supported Database Servers


Installation - Docker

There are many benefits to running Mura in a containerized environment. Docker and containerization in general have revolutionized software packaging and deployment.
(For more about working with Docker and containers, see the additional resources listed below.)

Deploying Mura with Docker

Additional Resources

Installation - Application Server

Installing Mura couldn't be easier. Follow the instructions below and you'll be up and running in minutes.

  1. Create an empty database (e.g., dbMura).
  2. Contact your sales or billing team to obtain access to the Mura Github repository.
  3. Once you have access, login to the Github repository and copy the contents of the Mura.zip file into your webroot (the directory where your site will live).
    1. NOTE: Do NOT place the files into a directory named "mura" since this is already used as a ColdFusion mapping and may cause issues.
  4. Go to the ColdFusion or Lucee Administrator, and create a Datasource (DSN) connecting to the database you created in the step above (e.g., dsnMuraCMS). While creating the DSN, also complete the following under Advanced Settings:
    1. Enable CLOB (enable long text retrieval)
    2. Under Allowed SQL, at a minimum, enable "SELECT, CREATE, INSERT, DROP, UPDATE, ALTER, DELETE."
  5. Open your browser, and then navigate to the domain or URL that you created on your web server that's pointing to the directory where your site will live. You should be presented with a setup form. Go ahead and complete the form using the information created above.
  6. Once you've successfully set up Mura, click the "Finish Set Up and Take Me to the Mura Admin" button. Keep in mind that once you do this, the Mura Set Up page will no longer be available (for security reasons). If you need to change any settings in the future, they will need to be made directly in  the "/config/settings.ini.cfm" file.
  7. Login to the Mura admin using the username and password chosen in the Mura Set Up page. It is highly recommended you utilize a complex password.
  8. If you would like to send scheduled emails or have scheduled content publishing when caching is turned on (caching is highly recommended for increased performance) you must change the "Ping" attribute in the \config\setting.ini.cfm to 1. On start up, Mura will attempt to create a scheduled task to check for event reminders, scheduled emails and to flush its cache for scheduled content.
    1. NOTE: Enabling this scheduled task may cause performance problems in some shared hosting environments.
  9. You're done installing Mura. Enjoy!

If your Web Server/Servlet Container does not support the extension of URLs to include query parameters after index.cfm (e.g. http://www.domain.com/index.cfm/default/widgets), or you simply prefer shorter URLs without index.cfm, you will need to configure your webserver for URL rewrites using apache mod_rewrite or isapi-rewrite or a free option to isapi-rewrite. In addition, you can find example htaccess.txt and web.config.txt files in the root of your Mura instance.